Showing posts with label healthy. Show all posts

Monday, March 4, 2013

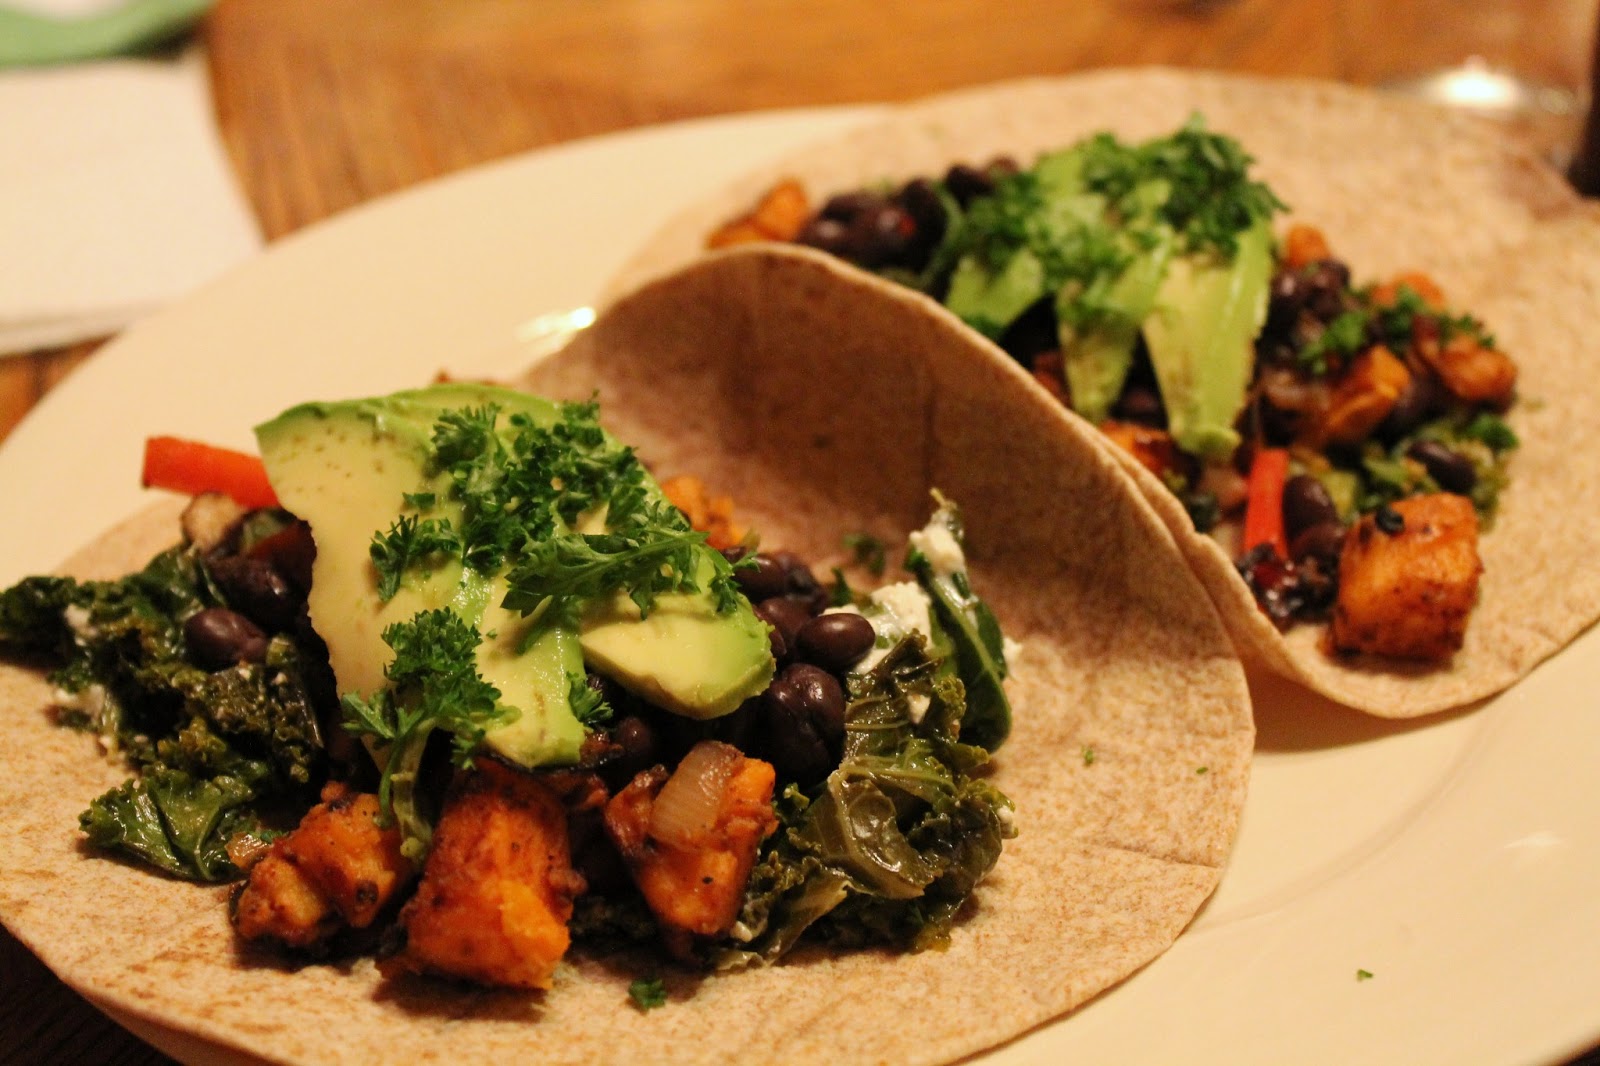
Kale & Sweet Potato Tacos


Serves: Makes 6 tacos

Ingredients:
1 large sweet potato, peeled and chopped
2 cloves garlic, minced
1/2 red onion, diced
1 red bell pepper, thinly sliced and chopped
1 tsp paprika
1 large bunch kale
1/3 cup feta cheese crumbles
1 tbsp lemon juice
6 10" whole wheat tortilla shells
1 cup black beans, drained and warmed
1 avocado, thinly sliced
2 tbsp fresh parsley, finely chopped

 Directions:
1. In a medium sized pot, bring water to a boil. Cook your sweet potato for 7-8 minutes, or until fork-tender.

2. While sweet potato boils, in a large saute pan heat olive oil over medium heat. Saute garlic and onions. Add sweet potato when it's done boiling. Season with paprika and salt and pepper to taste.

3. In another large saute pan, over medium heat, add some olive oil and kale. As kale begins to wilt, sprinkle with lemon juice.

4. Add red peppers to the sweet potato mixture and continue to cook, stirring occasionally, until potatoes are slightly browned.

5. When kale is completely cooked, remove from heat and stir in the feta cheese.

6. Heat the tortillas.

7. Top with kale, sweet potatoes, black beans, avocado, and parsley. Enjoy!


Bon Appetit!
The Food Whore

Wednesday, February 27, 2013

Spicy Sweet Potato Pork Burritos


Serves: 2

Ingredients:
olive oil
3 cloves garlic, minced
1 tsp sriracha
1 tsp dried thyme
medium sweet potato, peeled and chopped
2 whole wheat tortilla shells
1 cup spinach leaves
1 cup pulled pork
1/2 cup black beans, rinsed and drained
1/3 cup red onion, diced

Directions:
1. Boil a small pot of water and cook sweet potato until fork-tender, approximately 8 minutes.

2. In a small saute pan over medium heat, heat the olive oil and cook garlic until lightly browned.

3. Add sriracha, thyme, and sweet potato. Saute until sweet potato is browned.

4. Heat black beans and reserve.

5. Warm your tortillas.

6. Top with spinach and pork. Spoon sweet potatoes on top. Sprinkle black beans and onions on top of potatoes.

7. Wrap up your burrito and enjoy!


Bon Appetit!
The Food Whore

Friday, February 15, 2013

Trail Mix Pear Bread

Serves: Cut into 28 squares

Ingredients
3 cups flour
1 tsp baking soda
1/2 tsp salt
1 tsp cinnamon
1/2 tsp fresh ground nutmeg
1 cup sugar
1 cup oil
2 eggs, plus 2 egg yolks
1 tsp vanilla
5 pears, diced
1 cup trail mix 

Note: the trail mix I used was primarily sunflower seeds and various types of nuts. While trail mixes certainly vary, I think a kind without fruit or chocolate works best to keep this a healthier choice.

Directions
1. Preheat oven to 325 degrees.

2. In medium bowl, combine flour, baking soda, salt, cinnamon, and nutmeg and whisk to combine thoroughly, set aside.


3. In bowl of stand mixer, combine oil and sugar and beat to combine thoroughly.

4. Add egg and yolk and beat to combine thoroughly.

5. Beat in vanilla.

6. Turn mixer to low and add flour mixture, a little at a time, beating until just combined.

7. Stir in pears and trail mix. Batter will be very thick, but persevere.

8. Scrape batter into greased 9 x 13 pan, and spread to an even thickness.

9. Cook for approximately 50 minutes.

10. Let cool before serving.

Nutritional Info: 120 calories per square


Bon Appetit!
The Food Whore

Sunday, February 3, 2013

Meatless Monday: Vegetarian Sloppy Joes


Serves: 4

Ingredients:
2 cloves garlic, minced
1 yellow onion, diced
1 green bell pepper, diced
2 portobello mushroom caps, diced
10-12 crimini mushrooms, diced
1/2 cup walnuts, crushed
3/4 cup barbecue sauce
1 tsp sriracha sauce
2 avocados, sliced
4 onion rolls

Directions:
1. In a large saute pan, heat a bit of olive oil and saute your garlic, onions and peppers for 3-4 minutes over medium high heat.

2. Add the mushrooms and walnuts and continue to saute for 4-5 minutes or until mushrooms are soft.

3. Add the barbecue sauce and sriracha. Reduce the heat to medium-low and simmer for 5 minutes.

4. Toast your buns lightly. Spoon sloppy joe filling on to the bottom buns. Top with avocado and serve.

Nutritional Info: each sandwich has 591 calories

Bon Appetit!
The Food Whore

Friday, February 1, 2013

Vanilla Roasted Pear Frozen Yogurt


Two weeks in a row, I got pears in my CSA delivery. I had pears out the wazoo. Something had to be done. So I trusted Google once again. And once again, Google steered me in a pretty tasty direction.

Serves: 10

Ingredients:
9 medium pears, peeled, halved, and cored
1/3 cup brown sugar, packed
1 cup water
2 tsp vanilla
4 cups plain yogurt

Directions:
1. Pre-heat oven to 400*.

2. Place pear halves in a 9 x 13 pan. Sprinkle with brown sugar and vanilla. Add water.

3. Roast for 45 minutes.

4. Remove from oven. Let cool completely and then transfer entire pan to the fridge to chill for 1 hour.

5. Set aside 6 of the pear halves for topping your frozen yogurt.

6. Place the rest of the halves along with the juice in a blender or food processor and blend until you have a smooth puree.

7. Mix puree, yogurt and honey and place in your ice cream maker. Follow the directions for the ice cream maker.


8. When frozen yogurt is done, transfer to a freezer-safe container and chill for 1-2 hours, stirring occasionally, before serving. If you're not planning to eat it right away, be sure to set it out for about 30 minutes before serving to soften.

*Note: I really think this frozen yogurt is best when served immediately after the 1-2 hours in the freezer. It's much creamier then. Once it's been frozen overnight, it still tastes good, but it has a frostier texture that is not as amazing in my opinion. 

9. To serve, sprinkle lightly with cinnamon and top with diced reserved pears.


Nutritional Info: 167 calories per 1 cup serving

Bon Appetit!
The Food Whore

Thursday, January 24, 2013

Sausage, Kale and White Bean Stew


This stew is super easy and is made mostly from items that you probably already have on hand in your pantry and produce drawer. I love it for weeknights because you can put it together in about a half hour, and it makes enough servings for leftovers. And the leftovers are worth it . . . the stew thickens overnight in the fridge and I think is even better the next day. 

Serves: 5

Ingredients:
1 cup onion, chopped
2 cloves garlic, minced
7 oz turkey sausage (I prefer Butterball Recipe Starters), sliced
2 Yukon gold potatoes, chopped
3 carrots, chopped
1 15 oz can crushed tomatoes
1 15 oz can cannelini beans
3-4 basil leaves, chopped
2-3 cups kale leaves, torn into bite-sized pieces

Directions:
1. In a large stock pot, heat a bit of olive oil over medium heat. Add in onion and garlic and saute for 4-5 minutes or until onion is translucent.

2. Toss in sausage and continue to saute until lightly browned, approximately 7 minutes.

3. Add in your potatoes and saute for 4-5 minutes, stirring occasionally. Add carrots and continue to cook for another 4-5 minutes.

4. Add in tomatoes and beans, then add enough water to cover ingredients. Turn heat up to high and bring to a boil. Boil for 2-3 minutes, then reduce heat to medium-low and simmer. 

5. Add in kale and basil. Season with salt and pepper. Cook until kale is wilted. Soup can be served immediately if you're starving. But if you have time (and patience) to wait, allow it to simmer for 15-20 minutes to allow the stew to thicken.

Nutritional Info: 270 calories per 2 1/2 cup serving

Bon Appetit!
The Food Whore

Saturday, January 12, 2013

Cous Cous Paella

Serves: 5

Ingredients:
2 cloves garlic, minced
1 small onion, diced
2 sausages, chopped
1 green bell pepper, diced
3 carrots, peeled and chopped
3/4 cup black beans, drained and rinsed
3 sun-dried tomatoes, chopped
3/4 cup frozen peas
1 cup uncooked cous cous
1 pinch saffron
salt and pepper to taste
hot sauce (optional)

Directions:
1. In a large skillet, saute garlic and onion until soft and slightly translucent over medium heat with just a touch of olive oil.

2. Add in sausage, carrots, and bell pepper. (I use pre-cooked sausage that just needs to be heated.) Cook until sausage is lightly browned and peppers are soft.

3. Add in black beans, tomatoes, and peas. Cook until warmed through.

4. Add 1 1/2 cups of warm water. Bring to a boil and stir in cous cous and saffron. You may need to add a little more water if cous cous is too dry. Stir for 3-4 minutes while cous cous cooks up.

5. Season with salt and pepper. Add some hot sauce if you like a little spice. Enjoy.

Nutritional Info: each serving has 290 calories

Bon Appetit!
The Food Whore

Monday, January 7, 2013

Meatless Monday: Winter Squash Quinoa

I was looking for a good way to use up some random veggies I had leftover from last week's CSA. I found a few inspiring ideas online and melded them together to come up with this one. I served it as an entree--I think it's filling enough, it could also be served in smaller portions as a side item.


Serves: 4+ (more can be served if this is used as a side, but it serves 4 as an entree)

Ingredients:
4 cups quinoa, prepared
1/2 cup green bell pepper, diced
1/3 cup black beans, drained and rinsed
1 large yellow onion, diced
3 cloves of garlic, minced
1 acorn squash
3 small-medium Japanese sweet potatoes, cubed
1 tsp dried thyme
1/4 tsp nutmeg
olive oil for sauteing
salt and pepper to taste

Notes: I used Japanese sweet potato, which has a similar texture and flavor to yucca. If you can't find the Japanese variety, regular sweet potato will do.

Directions:
1. Prepare the quinoa and set aside, keeping warm.

2. Pre-heat oven to 375. Cut the acorn squash in half lengthwise. Drizzle with olive oil and season with half of the thyme and salt and pepper. Roast for 45 minutes, cut-side up.

3. While squash is roasting, in a large saute pan, heat olive oil and saute 1/2 of the garlic and 1/2 of the onion for 3-4 minutes over medium heat. Add in the sweet potato and saute for approximately 15 minutes or until potato is tender. Season with the remaining thyme, nutmeg, and salt and pepper to taste.

4. In a small saute pan, heat olive oil and saute remaining garlic, onion and peppers until soft. Stir in black beans and heat until warm. Stir bean and pepper mixture into the quinoa.

5. When squash is done roasting, remove from oven. Scrape off seeds and stringy middle goop. Carve the "flesh" out of the rind and chop into bite-size pieces. Toss those into the pan with the sweet potato and saute for a few minutes more.

6. Spoon quinoa onto plate. Spoon sweet potato mixture on top and serve.

Nutritional Info: approx. 400 calories in a serving

Bon Appetit!
The Food Whore

Tuesday, January 1, 2013

Carrot Cranberry Salad

A tasty, sweeter salad that's great for winter months when most produce is not at its peak.

Serves: 2

Ingredients:
3 cups chopped green leaf lettuce
3 medium carrots, julienned
1/3 cup craisins
1/2 cup red onion, sliced very thin
2 tbsp feta cheese crumbles
2 tbsp olive oil
1 tbsp red wine vinegar
1 tsp orange juice
salt and pepper to taste

Directions:
1. In a small container with a lid, combine olive oil, vinegar, oj, and salt and pepper. Shake vigorously to mix.

2. Mix carrots, feta, craisins and onions in a medium sized bowl.

3. Toss carrot mix in the dressing.

4. Spoon carrot mixture onto a bed of leaf lettuce on a plate and serve immediately.

Nutritional info: 225 calories per serving

Bon Appetit!
The Food Whore

Tuesday, July 19, 2011

Baked Kale "Chips"

I've heard a lot about kale "chips" lately. It seems to be one of the trendy new health foods to be eating these days. I'll admit my interest was piqued when I heard that this was a healthy, tasty alternative to potato chips. I am a savory snacker. I prefer a crunchy, salty snack to a sweet one anyday. But I was never moved to go out and buy kale and try this recipe.

Then Fresh Picks delivered kale to me TWO weeks in a row. I had two large bags of it in my frige and no thought as to how I would incorporate it into meals. I figured I would finally give these "chips" a go . . . and if they sucked, the remaining kale would become compost. (I hate how wasteful that sounds, but I'd rather compost it than let it rot in my produce drawer.)

So I googled a bunch of recipes and they all pretty much said the same thing: tear into small pieces, toss with olive oil and seasonings and bake at a low temp. And that's what I did. So how did they turn out? Well, they smelled awesome when they were cooking, which is always a plus. They were a savory treat with some texture to them. It's a tasty way to eat kale and incorporate more greens into your diet. But as far as a substitute for chips? No way! As the kale bakes, it gets papery thin. There is no satisfying CRUNCH when you bite into them, and for me, that's why I love chips so much. (Hence the quotation marks around chips in this post.)

Here's the bottom line: I'll definitely make these again with the kale I have in my frige. And if FP sends me more kale, I'll keep making these. But I wouldn't go out and buy kale just to make these again. Hope that helps!


Baked Kale "Chips"

Ingredients
4 cups kale leaves
2-3 tbsp olive oil
1 tsp garlic powder
1 tsp chipotle chili powder
salt and pepper to taste

Directions
1. Using a small paring knife, cut the "ribs" out of the kale leaves.  Basically, you don't want the big stem running down the middle--you just want the leafy part.

2. Rinse leaves and allow to dry, using a salad spinner, collander or just lay them out on paper towels.

3. Toss all the leaves into a large plastic baggie with the olive oil. Shake to coat the leaves, then kind of "massage" the oil into the leaves.

4. Dump the leaves out onto a baking sheet, making sure they are in a single layer--they won't crisp up right if they are stacked. You can bunch them in tight, just keep them single layer.

5. Sprinkle with the spices and seasonings.

Note: As for baking temps and times, the recipes I found varied quite a bit. Here's what I did (with good results):

6. Bake at 275* for 20 minutes. At the 10 minute mark, stir and flip the "chips" and bake for 10 more minutes.  At the end of 20 minutes, stir and flip one more time, then turn off the oven and leave the "chips" in there for 5 more minutes.

Makes 3-4 servings; Enjoy!

Note: I have a pasta spoon  which worked really well in stirring and flipping the hot chips.

What I really like about this recipe is that there is room for variation. I saw a lot of combinations of seasonings online that produce different flavors of chips. Since we have 2-3 meals worth of kale left, I'm looking forward to trying different flavors of "chips."


Bon Appetit!
The Food Whore

Monday, July 11, 2011

Meatless Monday: Three Bean Salad with Chipotle Lime Dressing

The other day I really wanted to make a three bean salad. I was at the store and beans were on sale, so I grabbed a few cans and headed home. Then I decided to look up a recipe for three bean salad because I've never made one and wanted a little guidance. Well, I wasn't thrilled with the recipes out there, and I had no idea green beans were one of the three beans in three bean salad. I like green beans, but not in a cold salad. I'd bought pinto, black, and red beans. Whoops.

So of course I just made something up as I went along . . . and I'm totally gonna toot my own horn and say it was awesome.

Three Bean Salad with Chipotle Lime Dressing

Note: this recipe uses partial cans of beans because I didn't want a lot of leftovers not knowing if it would be good or not. Feel free to adjust the ratios and use full cans if you'd like, or just freeze the leftover beans for another recipe.

Ingredients
salad:
2/3 can black beans, rinsed and drained
2/3 can pinto beans, rinsed and drained
2/3 can red beans, rinsed and drained
1/2 cup corn (frozen is fine, just thaw it out first)
1/2 cup white onion, diced
1 clove garlic, minced
1 tsp jalapeno, minced

dressing:
3 tbsp olive oil
1 tbsp chipotle hot sauce (I really like Cholula's)
juice of 1/2 lime
1 tsp fresh cilantro, chopped

Directions
1. In a medium bowl, combine all of the salad ingredients and mix well. Be sure to stir gently so you don't crush the beans.

2. In a small container with a tight-fitting lid, combine all of the dressing ingredients and shake vigorously.

3. Pour dressing over the salad, and stir. Serve immediately or refrigerate for later. This salad is good chilled or at room temp.

Makes 4-5 servings

Note: this salad was awesome as a side dish, but totally works as a vegetarian taco too. Just sprinkle some cheese, shredded lettuce and diced tomatoes into a small tortilla shell and scoop in some of the bean salad and voila: instant veggie tacos! Or crumble the taco shells into a good-sized bowl with more lettuce and make a veggie taco salad!
Bon Appetit!
The Food Whore

Friday, July 8, 2011

Quick and Dirty Salsa

When I'm in plan-ahead mode, this is my go-to salsa recipe. But sometimes I'm not in plan-ahead mode. Sometimes it's 5:00 on a Friday, and I want some chips and salsa to go with my beer. My laziness inspired this quick and dirty salsa recipe, which is quickly becoming my favorite.


Quick and Dirty Salsa

Ingredients
1 large or 2 medium tomatoes, diced
1 clove garlic, minced
1 tsp fresh jalapeno, minced
1/4 cup white onion, diced
1/2 tsp fresh cilantro, chopped (if you have it)
3-4 drops of your favorite hot sauce
salt and pepper to taste

Directions
1. Mix all ingredients in a small bowl. If you're really impatient, go ahead and eat it now. If you can wait, it's best to let it all marinate for 30+ minutes to get a bit juicy.

Note: this salsa is great for tacos and other dishes where you want a chunkier, less liquid salsa.

Bon Appetit!
The Food Whore

Saturday, April 2, 2011

Chewy Granola Bars

Since Mr. Foodwhore is working now, he likes to have a lot of snack food on hand to munch on at his desk. But store-bought snack food is full of sugar, empty calories and can be expensive. So I'm always looking for healthy, easy options to make at home.  I tried this chewy granola bar recipe, tweaked from a combination of recipes found on all-recipes.com.

This recipe gave me delicious granola bits, easy for snacking on and delicious to crumble up and eat with yogurt or as cereal, but it wasn't exactly a granola bar. So I'm still on the search for a good granola bar recipe.
Ingredients
4 1/2 cups oats
1/2 cup all-purpose flour
1/2 cup whole wheat flour
1 teaspoon baking soda
1 teaspoon vanilla extract
1/2 cup margerine, softened
1/2 cup peanut butter, softened
1 cup almonds, sliced or crushed
1/2 cup honey
1/3 cup packed brown sugar
2/3 cup raisins

Directions
1. Preheat oven to 325* and lightly grease a 9x13 inch pan.

2. In a large mixing bowl combine all of the ingredients except the raisins.  Mix well.

3. Gently stir in the raisins.

4. Lightly press mixture into the pan. Bake for 20-30 minutes or until golden brown.

5. Let cool completely before cutting or removing from the pan.

Bon Appetit!
The Food Whore

Monday, February 28, 2011

Meatless Monday: Buffalo Chick(pea) Sliders

Mr. Foodwhore and I love spicy foods. Buffalo chicken sandwiches are one of our favorites. But they are hardly healthy. As part of my efforts to incorporate more meatless meals into our diet, I went back to a trusted favorite food blogger, Ashlee, at Veggie By Season. Ashlee has written a few blogs over the years with some great recipes that I have enjoyed. This is another one of hers and another favorite of mine! One thing I loved about these patties is that they were substantial and held their shape well throughout cooking and eating--both of which are rare traits in veggie patties.


Buffalo Chick(pea) Sliders
adpated from Veggie By Season

Ingredients
1 15 oz. can chick peas, drained

1/2 cup oats
1/4 cup buffalo sauce (Franks Red Hot is my favorite)
1 egg white, beaten
1 small yellow onion, diced
1 tsp garlic powder
Salt and pepper to taste

Directions
1. In a food processor, combine 3/4 of the chick peas, buffalo sauce, oats and 3/4 of the onion. Pulse until mixture is well blended and no large piece remain.


2. Add the remaining chick peas and onion and pulse just once to break up the peas, but not puree them like the rest.

3. Dump the mixture into a bowl, combine the rest of the ingredients and mix well.

Note: the patty mix can be stored in the frige over night if you prefer to make it ahead of time.

4. Form patties from the mixture. (I made four large patties, which was a bit much for us. Next time I will probably make five or six and save the leftovers. Plus, these are pretty big patties to be called sliders!)


5. Heat the griddle to medium and  coat with non-stick spray.

6. Add the patties and cook for approx. seven minutes on each side.

7. To serve, we made sliders out of french rolls, lettuce, tomato and onion (and more Frank's Red Hot) and served with steak fries. Next time, I definitely want to add some bleu cheese crumbles to the sandwich for extra flavor.


Nutritional Info: this recipe makes four large patties at 154 calories each

UPDATE: I've since made this recipe a few more times and changed it up just a bit. I now add 2-3 tbsp bleu cheese crumbles to the mix for an extra bit of flavor.  And I've also made smaller nuggets with this recipe to serve as an appetizer (be sure to serve some bleu cheese dressing for dipping)!

Looking for something to do with the leftover patties? Try the Buffalo Blue Cheese Benedict!

Bon Appetit!
The Food Whore

Monday, February 21, 2011

Meatless Monday: Stuffed Tomatoes

I'm kind of surprised that Mr. FoodWhore has embraced the whole meat-free meal idea. He even told me last night that it's okay if I want to cook more meatless meals each week! These stuffed tomatoes, based on a recipe from Frugal Fun and Fortune, will definitely be in our regular rotation. They were super easy, low-hassle, and made almost entirely from stuff I already had on hand, which is always a bonus.

Note: From this recipe, we each had two medium tomatoes. It was a bit much with a side and a salad also. I think next time I will only make three tomatoes for us to share.


Ingredients
4 medium (or 2 large) tomatoes
1/4 cup bread crumbs
1 tbsp olive oil
1/4 cup black beans, drained
1/4 cup corn, frozen is fine (no need to thaw first)
2 cloves garlic, diced
1/3 cup white onion, diced
1/4 your favorite shredded cheese
2 fresh basil leaves, chopped
salt and pepper to taste

Directions
1. Preheat oven to 350*.

2. Using a small sharp knife, cut out the stem part of the top of the tomato; cutting a cone-shaped chunk out is easiest. Reserve these pieces.

3. Scoop out the seeds and inner pulp of the tomato. If there's good tomato flesh, save it. Toss the seeds. A melon baller works great for this, but a spoon should also do the trick. The tomato should have a good sized hole on top and be about 1/4" thick in order to retain its shape and hold the stuffing well.

4. Chop up any good pieces of tomato flesh that you reserved from the tomato and toss in a medium mixing bowl.

5. Add the rest of the ingredients and mix well.

6. Scoop a couple of spoonfuls of the filling into each tomato. Using a spoon, press down lightly to compact the filling and top off each tomato until the filling is gone.


7. Place the tomatoes on a greased cookie sheet or baking stone and cook for 15-20 minutes.

Note: What I love most about this recipe is that its super adaptable to a variety of tastes. If you don't like an ingredient, use another one. I'm looking forward to trying this with other combinations of ingredients, like: bell peppers, red onions, olives, mushrooms, chick peas, jalapenos, carrots, broccoli, sun-dried tomatoes, squash, feta, peas, artichoke hearts, and more!

Nutrtional Info: based on the above recipe and portions, two stuffed tomatoes contain approximately 225 calories.

Bon Appetit!
The Food Whore

Friday, February 18, 2011

My Stonyfield Yogurt Endorsement


Lately, I've been searching for a really good Greek style yogurt. I've had some good ones in the past, but I couldn't remember the brand. So I've been testing out different types. Well, I've hit the jack-pot: Stonyfield's Honey Vanilla Greek Yogurt!  It's the perfect blend of tart and sweet. It's thick and creamy . . . wonderful for icing the world's most perfect dessert!  Right now, my grocery store only offers the flavored varities, but I'm hoping to get my hands on the plain kind so I can use it as a dip for raw veggies.

If you haven't tried this yogurt yet, I highly recommend it.

*Stonyfield did not compensate me in any way for this endorsement. In fact, I don't think they even know I wrote this. But if someone at Stonyfield does read this and would like to thank me with copious (or even minimal) amounts of free yogurt, that would be wonderful!

Thursday, February 17, 2011

Quite Possibly the World's Most Perfect Dessert


I know that's a bold statement, but hear me out before you protest.

These little cupcakes have only . . . drumroll, please . . . 15 calories each, and, wait for it . . . they are delicious, moist, rich, chocolately, gooey and amazing! Seriously, 15 calories each. I'll give you a minute to let that sink in.

And now for the recipe.

The Perfect Low-Cal Chocolate Cupcake
Ingredients:
12-20 oz diet Coke, approx.
1 box Devil's Food cake mix
1 6 oz Stonyfield Greek Yogurt, Honey-Vanilla flavor
sprinkles, optional

Directions:
1. Preheat oven to 350*.  Grease cupcake tins (you'll be making 30 cupcakes).

Combine the cake mix with approx 12 oz of diet coke in a medium bowl. Add more coke as needed until batter is well blended.

2. Scoop 1 tbsp of batter into each cupcake compartment. It doesn't have to be exact--some of mine were heaping tbsps. But you should be able to get 30.

3. Bake according to directions on the box, taking into account that these cupcakes are a bit smaller than the box calls for, so cooking times may be slightly shorter.

4. Cool completely.

5. Ice with approx. 1 tsp of Greek yogurt on each cupcake. 1 6 oz container will ice about 20 cupcakes. I left some plain.

Note: some cupcakes may rise more and thus be thicker. Cut these in half and fill with "icing" to make a sandwich cookie. Feeling creative? Top with sprinkles or berries!

Nutritional Info: If you portion the cupcakes and icing according to the above directions, the cupcakes will each be only 15 calories!

Bon Appetit!
The Food Whore

Tuesday, April 13, 2010

Blackened Tilapia Sandwiches/Wraps


This recipe is so tasty and easy that we've had it many times in the past few weeks. Plus our grocery store has had Tilapia on sale quite a bit, which certainly helped! 

"But it's fish!" you say. "I don't know how to cook fish. And it always tastes so fishy!"

Tilapia is a great fish for people who (just think they) don't like seafood. It's my belief that if you don't like fish, it's because you haven't had it cooked properly. Seafood is wonderful.  When I was a kid, we didn't eat red meat.  We were poultry and seafood people all the way, and we ate a lot of seafood.  So here's an easy, affordable, and tasty recipe to get you on your way to liking fish.

Ingredients
2 3-5 oz Tilapia filets
2 of your favorite wraps or sandwich buns
2 pieces leaf lettuce
sliced tomato
sliced onion
sliced avocado
blackening seasoning
3 tbsp mayo
1 tbsp pickle relish
dash of salt

Directions
1. Heat a large skillet or grill-pan over medium-high heat. (I prefer the grill pan because I like to grill, but fish on a grill can be tricky.) Coat with non-stick spray.

2. Generously sprinkle blackening seasoning on one side of the fish and place that side face-down in the pan.  Coat the side facing up, as well.

3. Cook 3-4 minutes on each side. Cook times will depend on the thickness of the filet.  To test if it's done, just cut into it. Fish will be solid white all the way through when done. It's very important not to overcook fish.  Overcooked fish is nasty . . . and I will have failed you because you will still hate seafood after this.

4. While the fish is cooking, prep your other veggies and make the tartar sauce.

5. To make tartar sauce, combine salt, mayo and relish in a small dish and stir well. Et voila!  Nothing fancy, but is a perfect complement to the blackened fish.

6. Spread the tartar sauce on the bun/wrap.  Add the lettuce.  Top with the fish and pile on the rest of your veggies.


7. And you're done. Roll up that wrap or slap on the top bun and you're ready to eat!

Makes 2 wraps/sandwiches.  Depending on the bread you use, this recipe has 350-425 calories per sandwich.


Bon Appetit!
The FoodWhore

Monday, April 12, 2010

Chicken Sausage Pasta


Mr. FoodWhore works a couple nights a week, so that leaves me on my own for dinner.  This was one of those nights when I had no set plan, and I turned to the fridge for some inspiration.  I was going to just make pasta and veggies when I remembered I had found some chicken sausage in the freezer the day before.  This was a great, easy meal for a weeknight. And so full of flavor too!

Ingredients
2/3 cup penne pasta (or your favorite kind)
6 asparagus stalks (ends chopped off, cut in small pieces)
1 carrot, shredded
1/4 cup red onion, chopped
1-2 cloves of garlic, diced
1 tbsp sun-dried tomatoes, chopped
1 chicken sausage, sliced thinly
1/4 tsp red pepper flakes
1/4 tsp oregano
salt and pepper to taste

Directions
1. Boil water and cook your pasta; When done, drain and set aside to keep warm.

2. In a large skillet (or grill pan), heat non-stick spray to medium high and toss in the garlic and onions. Cook until slightly softened/browned. 

3. Add the carrots, tomatoes, and asparagus. Cook for 2-3 minutes.

4. Add the sausage and the herbs and spices and continue to cook for 3-4 minutes, or until sausage is done. (My sausage was pre-cooked and just had to be heated through. Cook times may vary if your sausage is uncooked.)

5. Place the pasta in a bowl and top with sausage and veggies.

Serving Suggestion: You could easily substitute the chicken sausage with shrimp or chicken breast or no meat at all.  Rice could also be used in place of the pasta. This is an easy dish that can be tweaked based on what's in your kitchen that night. I've made several variations over the past few weeks.

Makes 1 serving; Approximately 475 calories

Bon Appetit!
The FoodWhore

Sunday, April 11, 2010

Spicy Curry Veggie Burger


I love a good veggie burger. For simplicity, we usually eat Morning Star's Black Bean Burgers, which are so delicious and make for a really easy weeknight meal.  But when I found this recipe for a Spicy Curry Veggie Burger, I knew I wanted to try the home-made version.  Plus, my sister is a vegetarian, so I thought this would be a great meal to cook for her. She does not cook anything more complicated than spaghetti, so I enjoy finding tasty vegetarian meals so she can have a home-cooked me from time to time.

Ingredients
2 tablespoons olive or canola oil
1 red onion, chopped
1 tsp curry powder
1/2 tsp ground coriander
1/2 tsp crushed fennel seeds
1 can chickpeas, drained
1 carrot, grated
1/4 cup chopped walnuts
3 tbsp cilantro
salt and pepper to taste
flour

Directions
1. Heat a medium skillet to medium high and coat with non-stick cooking spray.

2. Add the onion, curry powder, coriander, and fennel. Cook until the onions soften, about 2-3 minutes.

3. Cover and cook for about 4 minutes longer.

4. Transfer the mixture to a food processor. Add the chickpeas and pulse until well mixed.

5. Add the carrot, walnuts, cilantro, salt, and pepper and pulse again.

6. Lightly dust hands with flour. Shape the mixture into six patties.

7. In a large skillet over medium heat, add more non-stick spray. Place the patties in the pan. Cook for about 4 minutes, or until browned on the bottom. Flip and cook for about 4 minutes longer, or until heated through.

Note: make sure the pan is heated thoroughly before adding the patties. Also, do not handle the patties unnecessarily.  They will hold their shape well, but can be difficult if flipped too often.  I also found that the patties cooked better when they were thinner.

Makes 6 patties; each one has approximately 160 calories. 

Serving Suggestion: top with low-fat cheese, lettuce, tomato, avocado and onion.  Try on a hamburger bun or in a wrap for something different.


Bon Appetit!
The FoodWhore

*adapted from a recipe by Women's Health Magazine online